NeuraEdge BubbleFlow Pro
Every order flow indicator on the market shows you bubbles when buying or selling pressure spikes. None of them answer the question that actually matters: did the bubble actually work? BubbleFlow Pro validates every event against the next three bars and tracks the results in a self-calibrating edge dashboard — so within a trading session, you know exactly which setups work on the asset you actually trade. Not backtest claims. Real measurements from your chart.
Volume bubble indicators are common. Most do one job: spot when buy or sell pressure spikes and plot a bubble. They leave you with the same questions every session — did price follow through, or did the move absorb and reverse? Which structural levels on your asset actually hold? Which timeframes are reliable for your style? You're left to guess, or to take a marketing page's backtest numbers on faith.
BubbleFlow Pro closes that gap. Each bar's volume is split into buy and sell pressure using range-weighted attribution. When either side exceeds 2.5 standard deviations above its rolling baseline, a bubble fires — sized by tier (T1 ordinary, T2 institutional, T3 rare extreme). Buy bubbles plot below the candle in green, sell bubbles plot above in red. Then the next three bars decide the verdict, and the dashboard logs the result by asset, timeframe, and structural context.
Six possible verdicts, each with a specific actionable read:
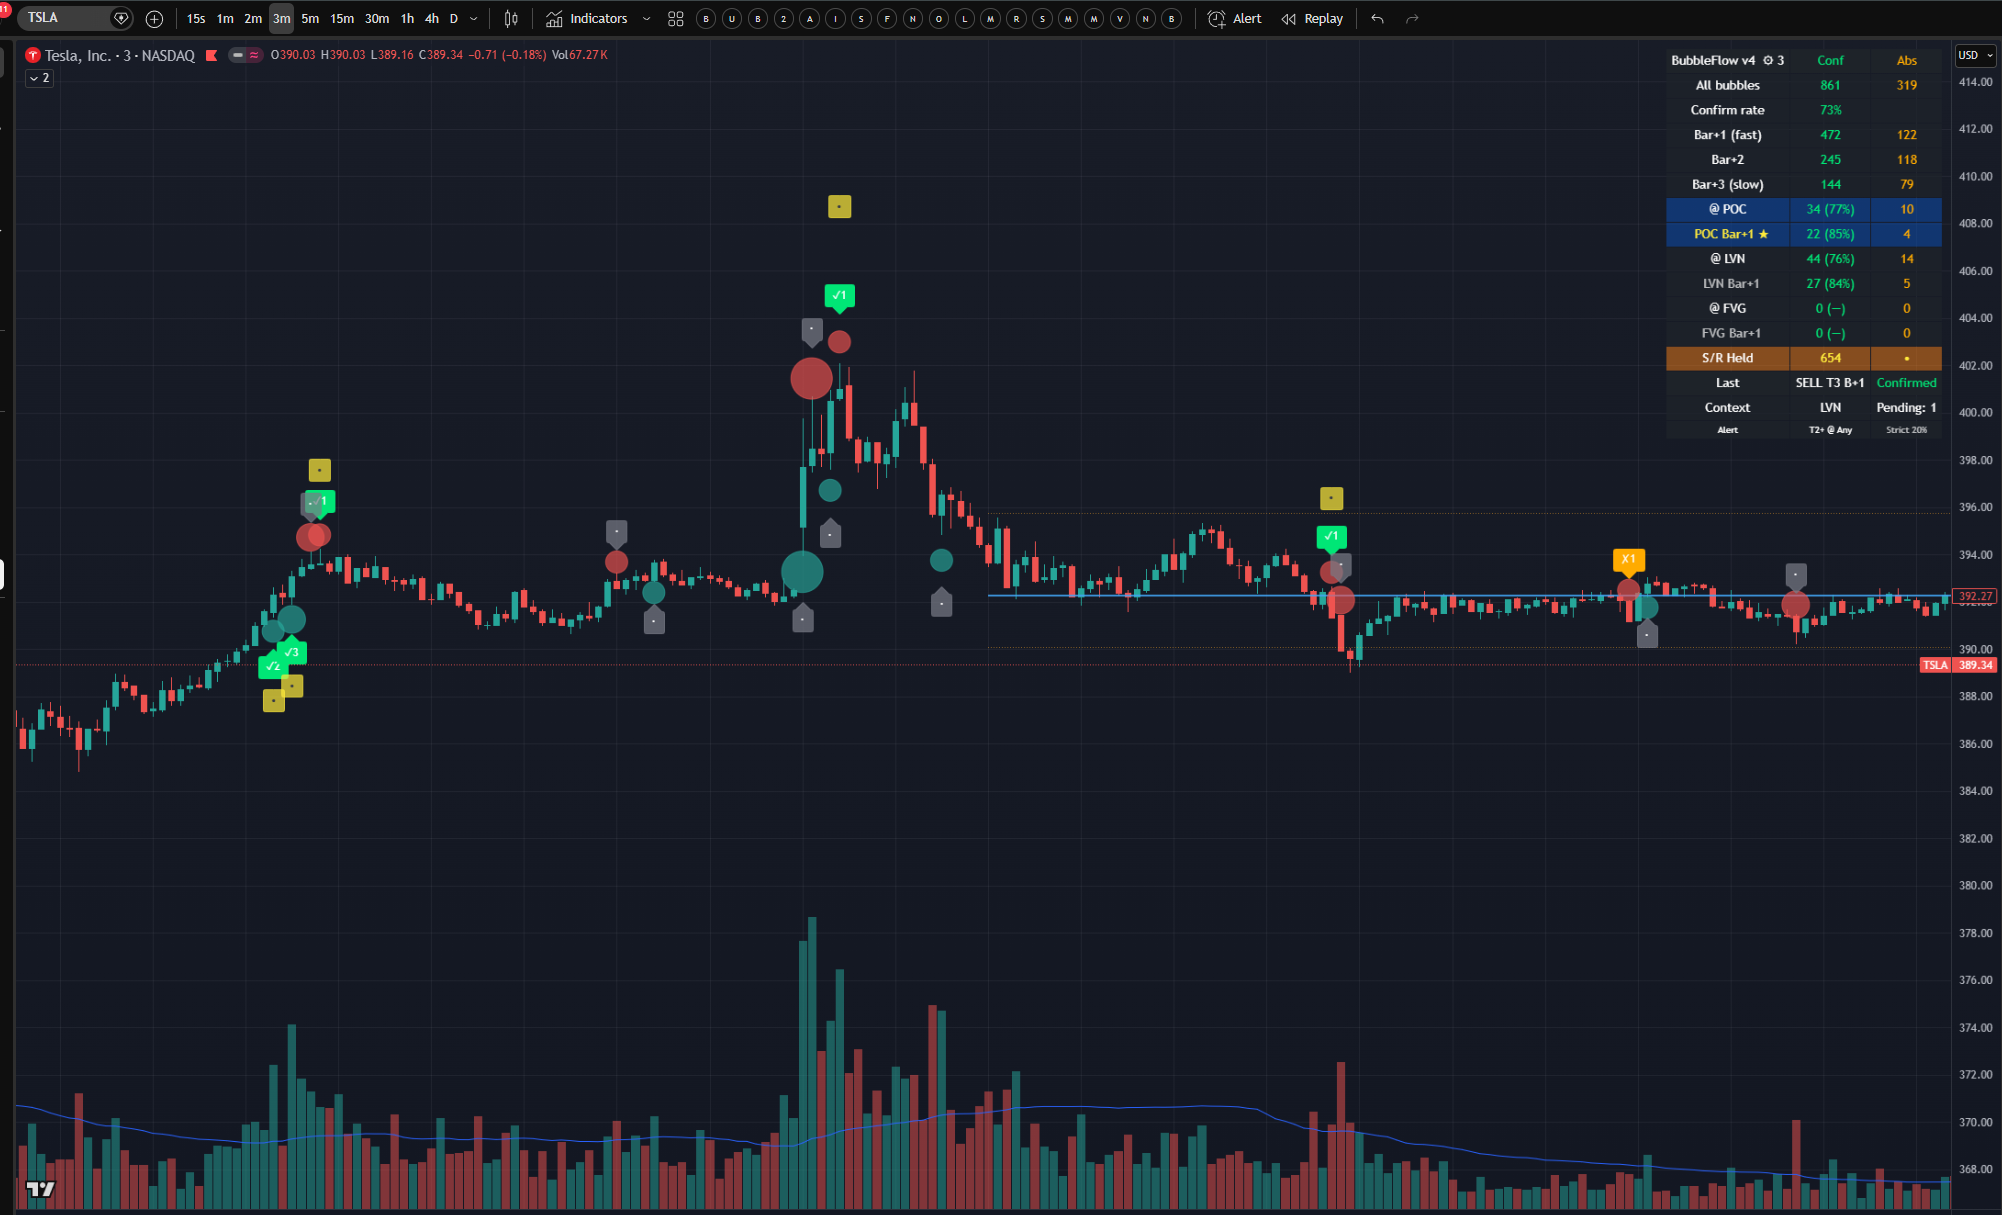
When a confirmed bubble's level holds against retests for the full S/R window (8 bars by default), it earns an S/R Held • marker — a yellow dot beyond the verdict tick. These are your strongest structural levels, automatically mapped.
The dashboard is the strategic core. Numbers are not backtested claims — they are computed from the bubbles BubbleFlow has actually classified on your chart, and grow as you keep the chart open.
- Confirm rate — your baseline edge across all bubbles
- Bar+1 / Bar+2 / Bar+3 — verdicts segmented by resolution speed
- @ POC ★ · POC Bar+1 ★ — your A+ setup row, typically the strongest context
- @ LVN · LVN Bar+1 · @ FVG · FVG Bar+1 — context-specific cross-tabs
- S/R Held · count of bubbles whose level defended through the full window
- Last · most recent bubble with direction, tier, and resolution speed
The most important rule: compare context-specific rates against the baseline. If your all-bubbles rate is 73% and POC Bar+1 is 85%, that's where your real edge lives. Trade those setups; skip the rest.
BubbleFlow Pro auto-scales when the chart timeframe changes. It produces stronger edge on liquid, institutionally-traded names — but it works on any asset with healthy volume.
- Mega-cap stocks — TSLA, NVDA, AAPL, META, AMZN (highest confirm rates)
- Index ETFs — SPY, QQQ, IWM (especially strong with GEX overlay)
- Mid-cap stocks — PLTR, SOFI, COIN (strong rates, smaller samples)
- Crypto majors — BTC, ETH (HTF preferred, chop reduces LTF edge)
- Commodities / FX — GLD, oil, major pairs (HTF preferred)
1h and 4h charts are where BubbleFlow earns its keep most decisively — every bubble at those timeframes represents real institutional commitment, not algorithmic chop. 5-minute is the day-trading sweet spot. The recommended workflow: HTF for regime and structure, LTF for execution timing.
BubbleFlow Pro and Delta Flow Pro are designed as complementary, not redundant. BubbleFlow is event-based — it fires discrete bubbles when institutional volume spikes and validates each one against the next three bars. Delta Flow Pro is state-based — it tracks cumulative pressure flowing through the market, momentum oscillator state, and developing divergence patterns over time.
The two answer different questions:
- Is something happening right now? — BubbleFlow (a bubble fires)
- Did it work? How fast? — BubbleFlow (verdict ✓1 / ✓2 / ✓3)
- Where is cumulative pressure flowing? — Delta Flow Pro (CVD trend + slope)
- Is momentum aligned with price? — Delta Flow Pro (Fisher, five tiers of divergence)
- What's the regime today? — Delta Flow Pro (VP patterns — accumulation, distribution, healthy trend)
- At a critical structural level? — Both (POC, LVN, FVG)
Signature combo · highest-conviction setup. A Sapphire or Ultimate divergence on Delta Flow Pro tells you a reversal is brewing. Watch BubbleFlow for a Tier 2+ bubble at POC or LVN in the divergence direction. The divergence says it's coming; the bubble says it just started. Wait for ✓1 to confirm and you've got both the state context and the event trigger.
The reverse is just as useful: when BubbleFlow alerts but Delta Flow Pro shows choppy CVD, no divergence, and no active regime pattern — skip the trade. Edge is too thin. State context tells you when an event is meaningful and when it's just noise.
Available together as the Order Flow Suite below — $150/month for both indicators, vs. $80 BubbleFlow alone.
Gamma exposure (GEX) data tells you the dealer hedging regime — whether market makers are long gamma (mean-reverting) or short gamma (trend-amplifying). This context is invisible to price action alone, but it transforms how every BubbleFlow signal should be interpreted.
The same bubble means different things in different regimes:
- Positive Gamma (above flip) — dealers sell rallies and buy dips. Bubbles tend to fade. Trade ✗1 absorptions aggressively. Take quick profits at POC.
- Near Zero Gamma — dealer hedging neutral. Bubbles can extend in either direction freely. Tier 3 bubbles often signal explosive moves; ride ✓1 confirms with wider stops.
- Negative Gamma (below flip) — dealers chase price both ways. Bubbles amplify into trends. Ride ✓1 confirms aggressively with trailing stops and wider targets.
GEX/SIG also identifies significant strike levels — gamma walls, put walls, call walls, max pain. A bubble that fires within ~0.25 ATR of one of these strikes behaves structurally like a bubble at POC: strong defense in the rejection direction, strong continuation on breaks.
The triple-confluence A+ setup. A Tier 2+ bubble at an SMC order block, at a GEX significant strike, with the gamma regime supporting the trade direction. These are rare — perhaps 1–3 per session on SPY — but they tend to deliver the cleanest moves of the day.
Available together as the Full NeuraEdge Suite below — $320/month for GEX/SIG platform access plus the Order Flow Suite and every NeuraEdge indicator.
BubbleFlow Pro is a technical analysis tool. It does not guarantee profits, predict future price movement with certainty, or constitute financial advice. Win rates shown on the dashboard are computed from historical bubbles on your specific chart and represent directional accuracy, not P&L performance. Real trading results will differ based on entry timing, stops, slippage, and execution costs.
Designed for educational and analytical purposes, to be used alongside proper risk management. Past performance does not predict future results. Traders are responsible for their own decisions.